


Juice Groove Router Jig
🚚 SHIPS WITHIN 2 DAYS.*
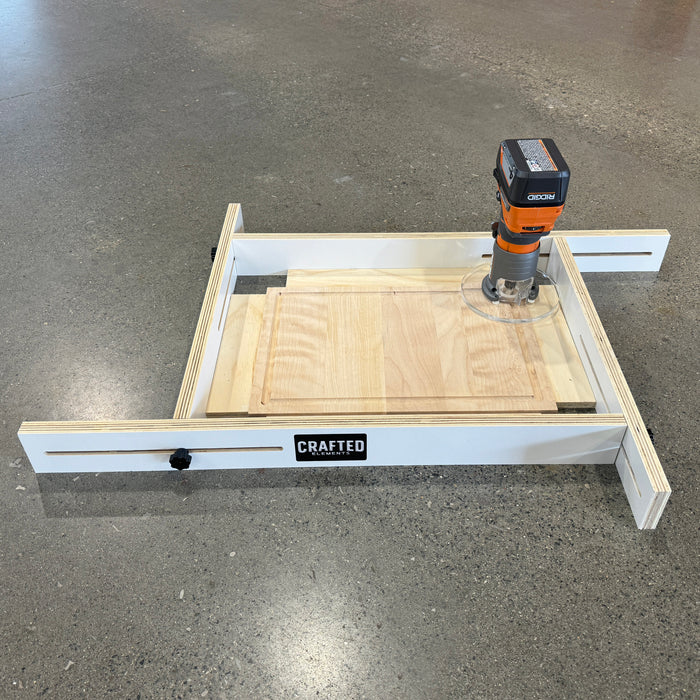
If you have ever tried to manually create juice grooves in cutting boards, butcher blocks or grooves in cabinet door fronts you know that it can be a tricky task. That's why we developed the Crafted Elements Juice Groove Router Jig.
What is essentially an adjustable four-sided box can make your groove making game so much easier. With its integrated channels, threaded posts and adjustable knobs you can quickly and easily resize it. The height of the panels is 2.75", allowing you to create grooves in material up to 2.5" thick (leaving ~1/4" for your router plate to make contact with).
Now in its second generation the new juice groove jig is crafted from 3/4" hardwood plywood for greater rigidity than the outgoing 1/2" acrylic version. It is less susceptible to warping and bending while in use than HDPE or acrylic plastic. It is also available in two different sizes!
Choose From A Standard Size Or XL (Extra Large) Size
Standard Size:
- Minimum Interior Size: 16x8"
- Maximum Interior Size: 26.5x18.5"
- Minimum Workpiece Size With 2.25" Spacers: 11.5x3.5"
- Maximum Workpiece Size With 2.25" Spacers: 22x14"
XL (Extra Large) Size:
- Minimum Interior Size: 21x11.75"
- Maximum Interior Size: 38.75x22.5"
- Minimum Workpiece Size With 2.25" Spacers: 16.5x7.25"
- Maximum Workpiece Size With 2.25" Spacers: 34.25x18"
Note: The minimum and maximum workpiece (cutting board) size is based on the assumption that your juice groove will be inset 3/4" from the perimeter of your board, and you are using a 6" diameter router plate and 2.25" spacers. If you are using a 4" diameter router plate (trim router), you would use 1.25" spacers and gain an extra inch on each side (2" total width, and 2" total height).
While it's compatible with any router it's easiest to use a trim router due to its size and mobility. We recommend using one of our 6" diameter round router bases for greater stability and accuracy. We offer router bases for all popular late model compact palm routers. Click here for more information.
Using the Crafted Elements Juice Groove Router Jig is easy...
- Loosely assemble the jig, leaving the knobs untightened.
- Place your square or rectangular workpiece within the confines of the jig.
- Place offset spacers made of scrap pieces of wood between your workpiece and the inner walls of the jig. This is to help position the router bit, and therefore the groove, closer to the perimeter of your piece. Watch the video below for more on this. Assuming a 6" round router base is used, the width of the spacers should be 2.25" to give you a standard 3/4" inset groove.
- Adjust the walls inward so they are tight against the spacers or workpiece. Make sure the corners are square / the like walls parallel to each other.
- Clamp down the jig to your workbench or t-track table (not included).
- Install the bit of choice in your router (a 1/2" rounded bit with a 1/4" shank works best) and position it at the desired depth of your groove. For a depth greater than 3/16" deep, you'll want to do multiple passes.
- Turn your router on and place it on the starting point of your workpiece, keeping the plastic router base in contact with the inside of the juice groove jig walls at all times.
- Move your router in the appropriate direction, letting the router plate ride against the interior walls. Do not place excess pressure on the walls to avoid bending or bowing.
- Once you get back to the start point your groove is now complete. If it needs to be deeper, adjust your router bit accordingly and return to step 7.
To get you up and running with your new juice groove router jig we created a full assembly and how-to video that includes some best practices and helpful tips. Check it out below: