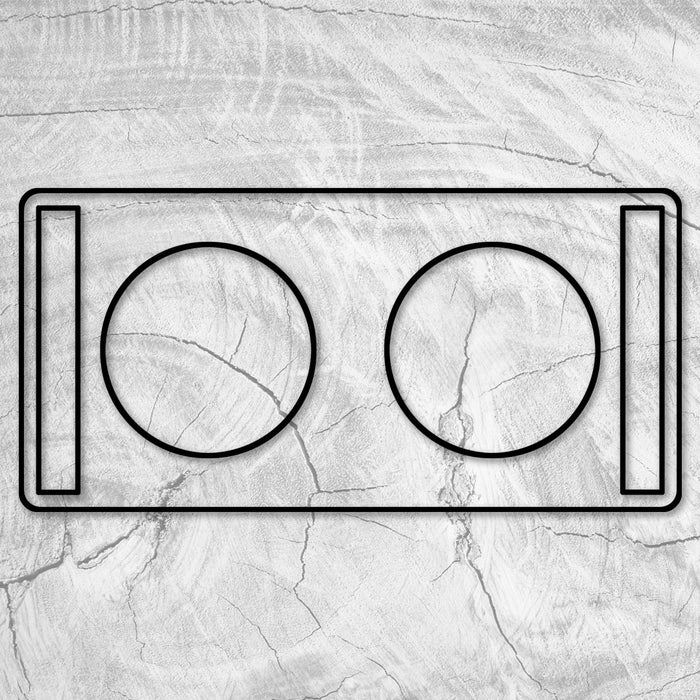
17.5x8.5" Dual Small Bowl Raised Dog Feeder Acrylic Router Template
🚚 SHIPS WITHIN 2 DAYS.*
Optional. Use Template With Mold To Create Pre-Shaped Resin & Wood Projects
| Overall Size: |
17.5x8.5" |
| Interior Pocket(s): |
(2) 5.55" Diameter, (2) 7.5x1" Rectangle |
| Tray Walls: |
N/A |
| Inner Corner Radius: |
1/8" (Use 1/4" Diameter Bit Max.) |
| Material: | Laser Cut 1/4" Cast Acrylic |
We're not sure where our crazy ideas come, but we're glad we pulled the trigger on this one. Our new dual small bowl pet feeder template empowers you to create wood (or wood/resin hybrid) dog and cat bowl stands.
Functional art always has more value since it has a practical use. If you want to try your hand at making raised feeder bowls for the MASSIVE pet owners market, this is the template to do it with!
The template has four separate sections. Two 5.55" diameter openings for the bowls and two 1x.7.5" rectangles for pocketing areas to insert the legs. Cut your own legs out of 1" thick solid wood (7.4" wide by however tall you want the bowl to be) and glue them to the pocketed out rectangular sections you create with the template.
This template was designed with two 5.55" diameter holes for the stainless steel dog bowls. We designed the template to fit the "Van Ness 32oz" 6.375" diameter stainless steel dog bowls that are readily available, and the best seller, on Amazon. The voids for the bowls in the template are smaller than the overall diameter of the dog bowl so that the curved lip keeps the bowl in place. Other brands of stainless steel dog bowls of a similar size, with a flat lip will likely also work but have not been tested. Note: Gorilla grip brand bowls will NOT fit this mold.
Crafted Elements Acrylic Router Templates
The Crafted Elements line of laser cut acrylic router templates are precision cut templates designed especially for woodworkers. Unless you have access to a CNC machine in your shop these templates are the easiest, most accurate and most repeatable way to shape wood and wood+resin pieces into things like charcuterie boards, serving trays, handles, functional art and more.
Like our line of maker molds, we designed these templates to save you time and boost production efficiency. These take the guesswork out of shaping and fabricating. By simply pulling one of these clear templates off the shelf and lining it up on your material you’ll instantly know how your final piece will look before you even start cutting and shaping.
We laser cut all of our templates out of long lasting and durable 1/4” thick cast acrylic to ensure the bearing on your router bit has enough surface area to glide on. These templates can be used over and over and will quickly become a go-to tool in your shop.
Reduce errors, inaccuracy and problems with making complex shapes perfectly symmetrical. We even have templates to match many of our awkwardly shaped silicone molds, so you can cut and shape pieces of wood to fit perfectly snug within our molds before you pour your resin.
All you need is a template, flush trim router bit (like this one) and a router table. Even the most basic routers are capable of shaping materials up to 1.5” thick.
Using our templates is easy:
- Place the template over your material (usually wood or wood & epoxy resin). Trace the shape of the template onto your piece.
- Using a jig saw, scroll saw or a band saw (where appropriate) cut out the rough shape you traced onto your material, leaving between 1/16” and ¼” outside of the perimeter.
- Affix the template to your material using two sided tape or hot glue.
- Install your appropriately sized flush trim bit into the router in your router table such as the Crafted Elements 1/4" High Performance Spiral Down Cut Flush Trim Bit. Be sure your router bit has a blade long enough for the height of your material. Line up the bearing of your router bit with the acrylic template.
- Turn on your router and glide the template along the bearing of your router bit, allowing the router to remove the excess material on your piece, effectively duplicating the shape of the router template.
- Carefully remove the template from your material. Remove the two sided tape or hot glue. Sand any leftover residue off of your project. You can use goo-gone or other adhesive remover on the acrylic templates for any stubborn or sticky residue.
We also have a full tutorial on our YouTube channel which you can find posted below:


